Okay, so I’ve been digging into this whole NBA 2K24 passing animation thing, and let me tell you, it’s been a journey. I wanted to get my player looking smooth on the court, dishing out dimes like a seasoned pro. So, I started by figuring out what I needed to unlock those sweet, sweet animations.
Figuring Out the Requirements
First off, I realized that different animations have different requirements, mainly based on your player’s pass accuracy attribute. This makes sense, right? You can’t be throwing crazy no-look passes if your guy can’t even make a basic chest pass.
I checked a few online guides and found some general guidelines. Here’s what I gathered:
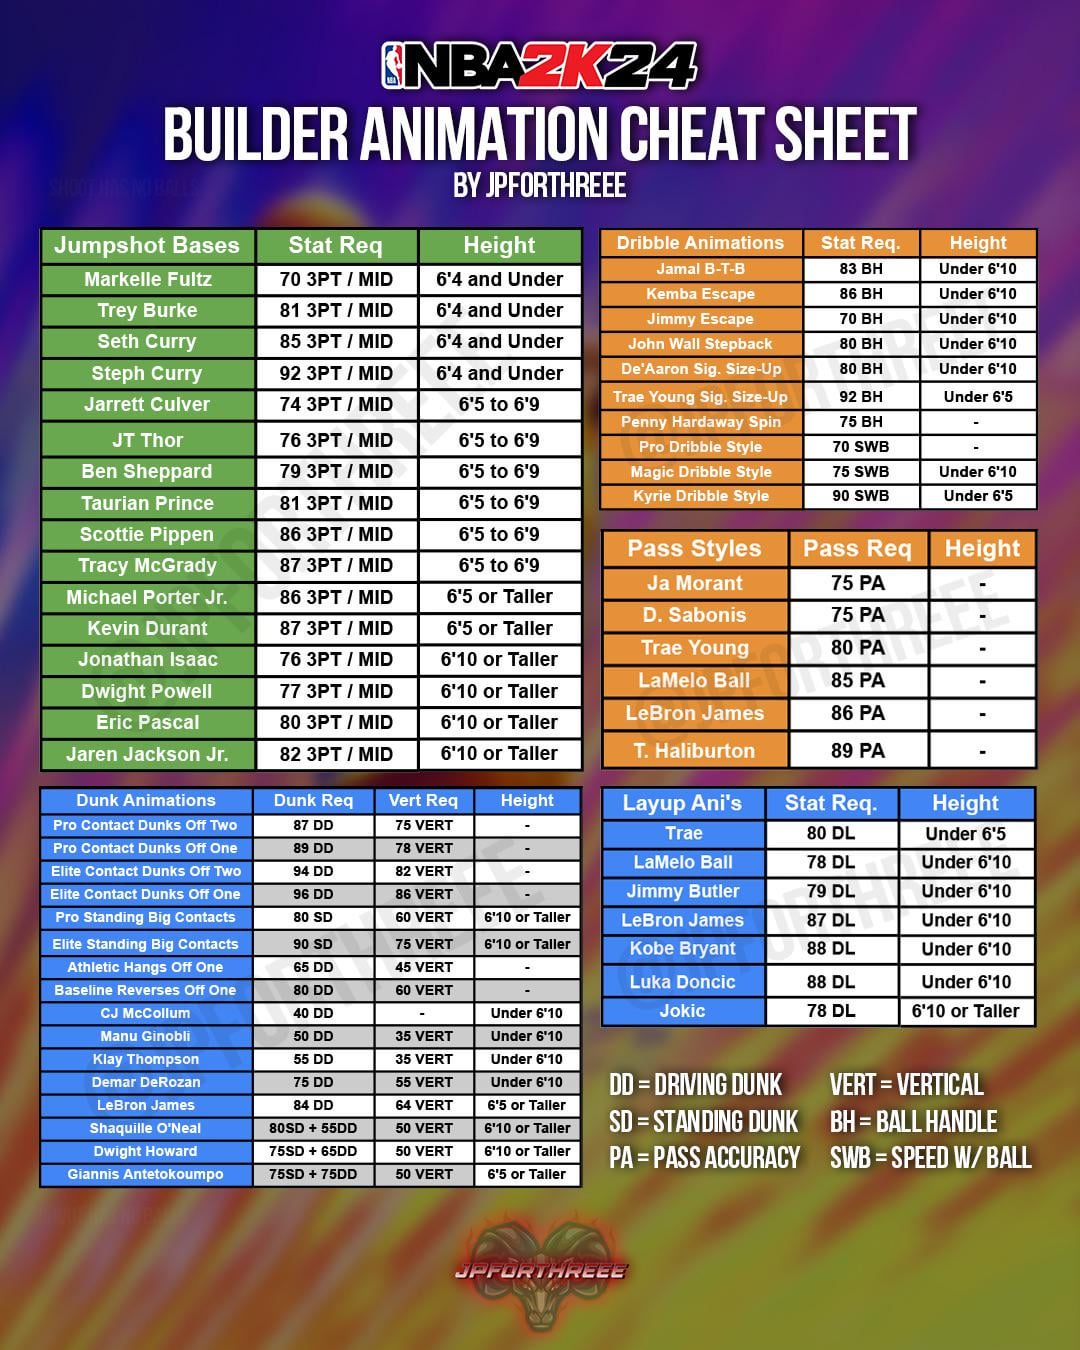
- Basic Passes: These are your bread and butter. You can unlock most of these with a pass accuracy rating in the 60s and 70s. Think bounce passes, simple chest passes, nothing too fancy.
- Flashy Passes: Now we’re talking! To start getting into those behind-the-back and no-look passes, you need to get that pass accuracy into the high 70s and 80s.
- Elite Passes: These are the top-tier animations, the ones that make you look like a true point god. We’re talking 90+ pass accuracy for these bad boys.
Grinding for Pass Accuracy
Once I had a rough idea of the requirements, it was time to hit the court. I knew I needed to boost my player’s pass accuracy, so I focused on that in MyCareer games.
I started by just trying to make good, solid passes. No risky stuff, just hitting the open man and keeping the ball moving. I noticed my assist numbers going up, and my pass accuracy rating slowly but surely increased.
Then I started experimenting with the different pass types. I found that using the “flashy pass” button for certain situations helped me get assists, but it was risky. Too many turnovers, and my grade would drop, which wasn’t helping.
After a lot of games and a few frustrating turnovers, I finally hit that 80 pass accuracy mark. Boom! I could finally unlock some of those flashy passes I’d been eyeing.
Unlocking and Equipping the Animations
This part was pretty straightforward. I went into the animation store, browsed through the passing styles, and bought the ones that were now available to me. I equipped them right away, eager to try them out in a game.
Testing Them Out on the Court
Man, it felt good to finally see my player throwing those fancy passes. I was dishing out behind-the-back dimes, no-look lasers, and all sorts of other cool stuff. My teammates were loving it, and my assist numbers were through the roof.
But it wasn’t all perfect. I still had to be smart about when to use those flashy passes. Throwing them into traffic or when a simple pass would do was a recipe for disaster.
I am still working on that. It’s a process, learning when to be flashy and when to be fundamental. But overall, I’m really happy with the progress I’ve made. My player is looking way more stylish on the court, and I’m having a blast dishing out assists like a true point guard.
So, there you have it. That’s my experience figuring out the passing animation requirements in NBA 2K24. It took some time and effort, but it was definitely worth it. If you’re looking to spice up your MyPlayer’s passing game, I hope this helps you out!


